Teamscale Integration for Eclipse
Teamscale integrates with Eclipse, including dedicated support for the ABAP Development Tools for Eclipse Before installing the Teamscale Integration for Eclipse, make sure its system requirements are met.
Installing the Plug-in
Depending on your needs, there are several options to install the Teamscale Integration for Eclipse.
Installing the Latest Version From the Eclipse Marketplace (recommended)
For most users, installing the latest version of the plug-in from the Eclipse Marketplace is recommended.
- Open the Teamscale Integration for Eclipse solution page at the Eclipse Marketplace.
- Drag the Install button from the solution page onto your running Eclipse workspace. This opens the installation wizard.
- Follow the instructions of the installation wizard
- Restart Eclipse when prompted.
Installing Any Version From the CQSE Website
Unlike the Eclipse Marketplace, the CQSE website offers both the latest version and older versions of the plug-in.
- Select Help > Install New Software... from the Eclipse menu bar.
- Enter a Work with location.
- Latest Version:
https://downloads.teamscale.com/ide/eclipse/latest/ - Older Version:
https://downloads.teamscale.com/ide/eclipse/vM.N.x/(replacingM.Nby the feature version you need but keeping the.x, e.g.,7.8.x)
- Latest Version:
- Select Teamscale Integration for Eclipse and any optional features you want.
- Click Next and follow the instructions of the installation wizard.
- Restart Eclipse when prompted.
Installing While Offline
In case you cannot reach the Eclipse Marketplace or CQSE Website during the installation, e.g., due to a security policy, you can perform an offline installation.
- Download an archive of the update site from the CQSE website.
- Latest Version:
https://downloads.teamscale.com/ide/eclipse/latest/teamscale-eclipse-update-site.zip - Specific Version:
https://downloads.teamscale.com/ide/eclipse/vM.N.x/teamscale-eclipse-update-site.zip(replacingM.Nby the feature version you need but keeping the.x, e.g.,7.8.x)
- Latest Version:
- Transfer the downloaded archive to your offline computer.
- Select Help > Install New Software... from the Eclipse menu bar.
- Click Add and the Archive.
- Select the downloaded archive.
- Select Teamscale Integration for Eclipse and any optional features you want.
- Click Next and follow the instructions of the installation wizard. (If this step fails, see the troubleshooting guide.)
- Restart Eclipse when prompted.
Installing on the Command Line
You can perform the offline installation on the command line as well.
- Unzip the downloaded archive.
- Use the Eclipse p2 director to install.bash
eclipse -nosplash -application org.eclipse.equinox.p2.director -repository file:///path/to/teamscale-eclipse-update-site -installIU com.teamscale.ide - (If you ever need to uninstall the plug-in, you can use the p2 director as well.)bash
eclipse -nosplash -application org.eclipse.equinox.p2.director -uninstallIU com.teamscale.ide
Don't Use Eclipse's Dropins Mechanism
With the dropins folder, Eclipse provides another way of installing plug-ins. We (and the Eclipse team) discourage using it for installing plug-ins unless you absolutely need to. You won't get error messages with the dropins mechanism as you would with the p2 director, e.g., in case of missing dependencies.
Connecting to Teamscale
After installing the plug-in, you need to perform the following actions to configure a Teamscale server:
- Open the Eclipse preferences dialog, navigate to the Teamscale settings (Window > Preferences... > Teamscale) and click on Add
- Enter a descriptive name and the URL of the Teamscale server
- Enter your Username and Access Key
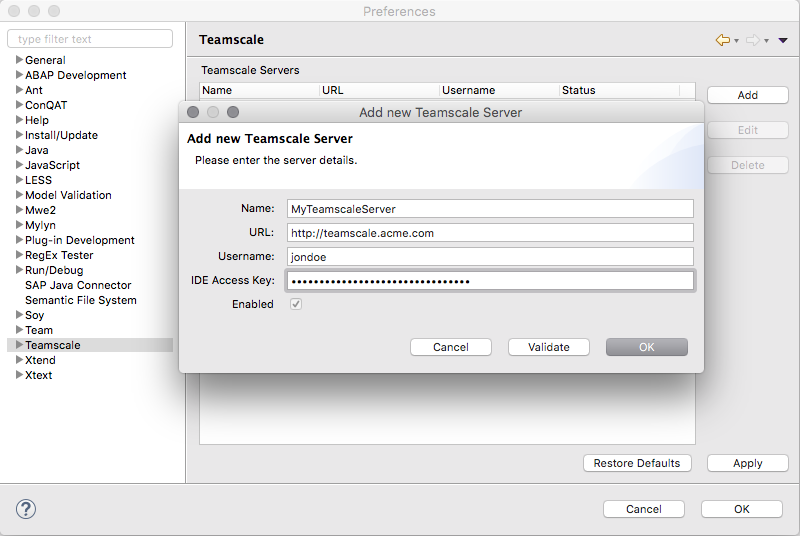
- Test the connection by clicking on Validate.
- Close the dialog by pressing OK.
Configuring Using .teamscale.toml Files
In addition to connecting to a Teamscale server, the local Eclipse projects need to be mapped to projects on the Teamscale server. Since Teamscale 9.9, this is done using one or more .teamscale.toml configuration files in a simple, uniform file format (.teamscale.toml).
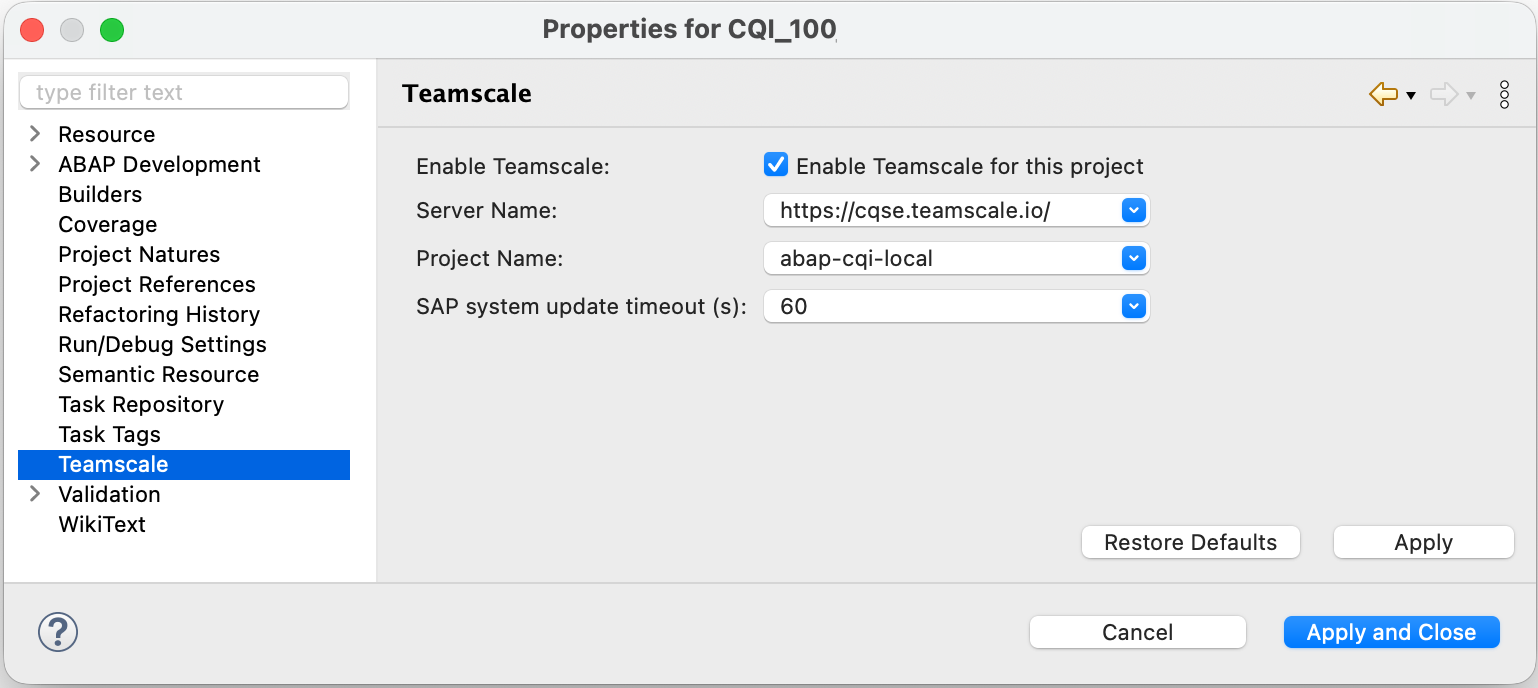
The only exception are ABAP projects, which are still configured using the ABAP projects' Properties.
Configuring ABAP Projects Using Project Properties
- Open the project properties by right-clicking on the project and selecting Properties.
- On the left menu, switch to the Teamscale entry.
- Click on Enable Teamscale for this project and select the appropriate server.
- Specify the time in seconds (default: 60) the plugin waits for a successful update of relevant Teamscale projects.
- Press Apply and Close to save the project properties.
Performing Pre-Commit Analysis
The Eclipse plug-in can be used to analyze changes prior to committing them to the repository. This functionality is called pre-commit analysis. The findings of these pre-commits are shown as any other finding in the Findings tool window. The Automatic Pre-Commit Analysis option under the Teamscale tab must be enabled: 
The pre-commit analysis is started automatically when you do one of the following actions:
- Open a file in the editor
- Switch to an already open file in the editor
- Save the file currently active editor
- Save all open files
- Activate ABAP code
Under the hood, Teamscale treats these changes as a commit on a new, virtual branch: your pre-commit branch. Eclipse will poll the Teamscale server until analysis of this commit is done. Once analysis is finished, Teamscale will show the findings from your pre-commit branch.
Note that, by default, the Teamscale server enforces some limits on the pre-commit branch w.r.t. the number of files that may be included in each pre-commit. These limits exist so that one overly large pre-commit upload does not disproportionately delay analysis of other commits. More information is available here .