Findings Perspective
The main use case of the Findings perspective is to inspect the findings of a system. Several filter mechanisms help to reduce the set of findings to a manageable size. For each finding, detailed information about its introduction (and removal) are available.
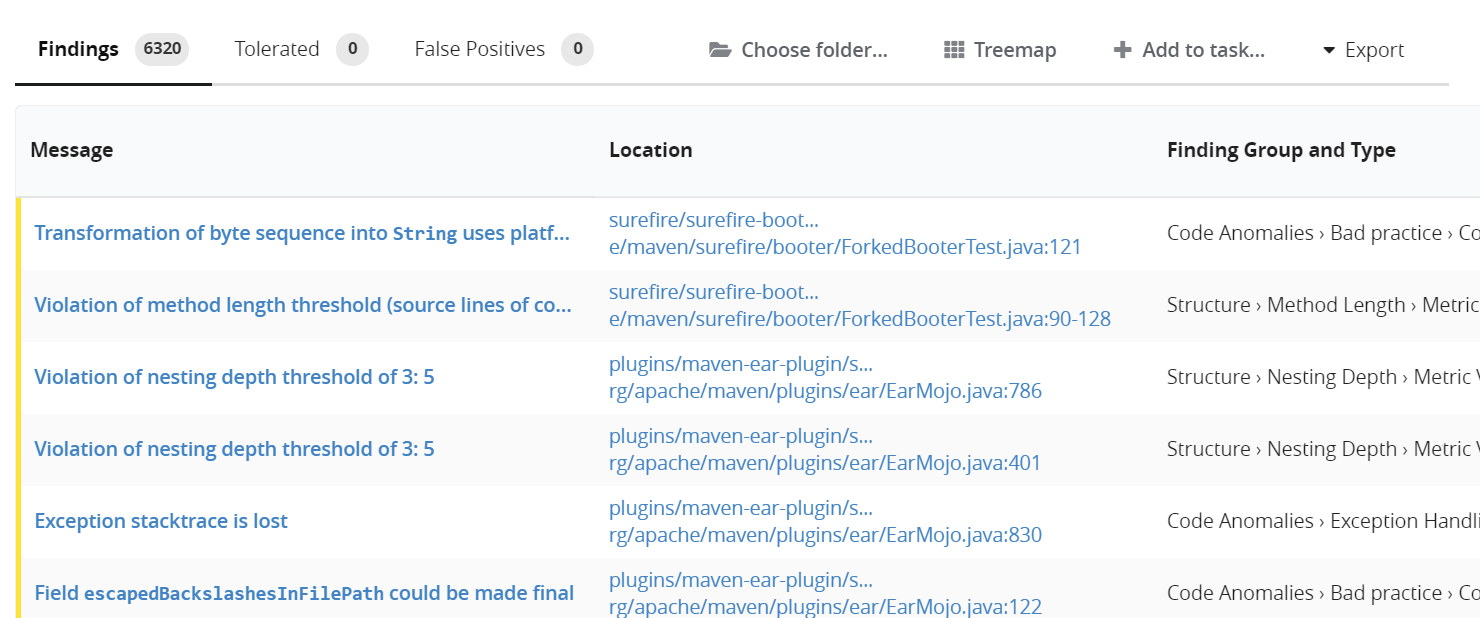
Findings Overview Table
When opening the Findings perspective, the Findings Overview View shows a table with all findings for a Teamscale project. For each finding, the table provides information about the finding’s message, the finding location, the finding group as well as the introduction date:
Action: Navigating All Findings
For grown software systems, the table of the Findings Overview View usually contains a very large number of findings. To better inspect and navigate them, the sidebar provides several different filter mechanisms and navigation helpers:
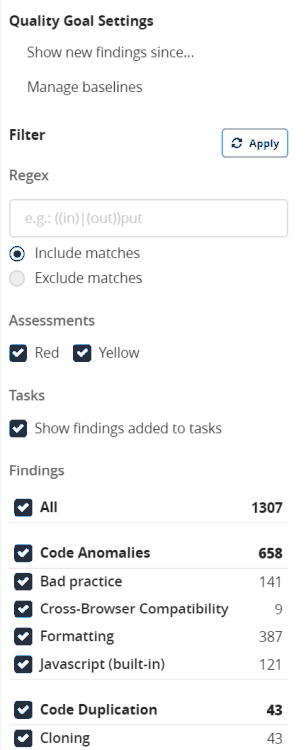
First, with the Quality Goal Settings , you can configure the underlying quality goal of the project. If a quality goal is set, only findings relevant to the quality goal will be shown in the table. The table will then be annotated, e.g., with [since Dec 06 2016 00:00]. Configuring the quality goal as well as its implication is described here. The Quality Goal Settings also provide the opportunity to manage the baselines which will be explained in a later action.
Second, the Finding Filter Settings give you the opportunity to use an arbitrary regular expression. Hitting »Enter« will apply the regular expression to the finding's message as well as to its location. The table then shows only findings matching the regular expression. For example, entering »test« will show findings with the message »Avoid ignoring JUnit tests«.
Third, Show Assessments offers to filter findings based on the finding severity. You can either show only red findings, only yellow findings or both. Under Tasks , you can configure to exclude findings which have been added to a task already.
Fourth, the rest of the sidebar can be used to filter based on finding category and finding group. After configuring the check boxes, you have to use the Apply button to apply the filters to the table.
Furthermore, the content of the table can be filtered based on a path. By clicking on Choose folder... in the table header, you can select subfolders of your project in a dialog opening up. After the selection, the table will show only findings from the specific subfolder. If you are working with an architecture definition, you can also select the architecture and pick a component or subcomponent. Then only findings in files will be shown that map to the selected component.
Additionally, the table can be sorted by the values of all four columns. Clicking on the header of one column will sort in descending order, i.e. showing the newest introduction dates or messages starting with »A« first. Clicking the column header again will reverse the order.
Tolerated Findings View
Additionally, you can use the main tabs to view findings that have been marked as tolerated or false positive. For example, clicking on the Tolerated tab will open the Tolerated Findings View:

The view is designed in analogy to the Findings Overview View. The table additionally shows the Toleration Date which denotes the date of setting this finding as tolerated, and the Toleration Rationale which gives a reason for tolerating this finding. In case branch support was enabled for the underlying project, a finding is tolerated only for the current branch. If the branch which contains the tolerated finding is merged, the toleration is transferred to the other branch. With the additional field Tolerated Rationale provided in the sidebar of this perspective, the tolerated findings can be filtered by their rationale.
False Positive Findings View
Similar to the Tolerated Findings View, the table provides a link in its header to the false positive findings. Choosing the False Positives tab will open the False Positive Findings View:

The table additionally shows the False Positive Date which denotes the date of setting this finding as false positive, and the False Positive Rationale which gives a reason for tolerating this finding. In case branch support was enabled for the underlying project, a finding is set as false positive only for the current branch. If the branch which contains the false positive finding is merged, the setting as false positive is transferred to the other branch. With the additional field False Positive Rationale provided in the sidebar of this perspective, the false positive findings can be filtered by their rationale.
Action: Inspecting a Finding
The table provides several possibilities to obtain more information about a single finding. For example, clicking on the finding location will open the Code Detail View and show the source code file containing the finding. Clicking on the finding's message opens up the Finding Detail View.
Findings Detail View
The Findings Detail view provides detailed information about a single finding:
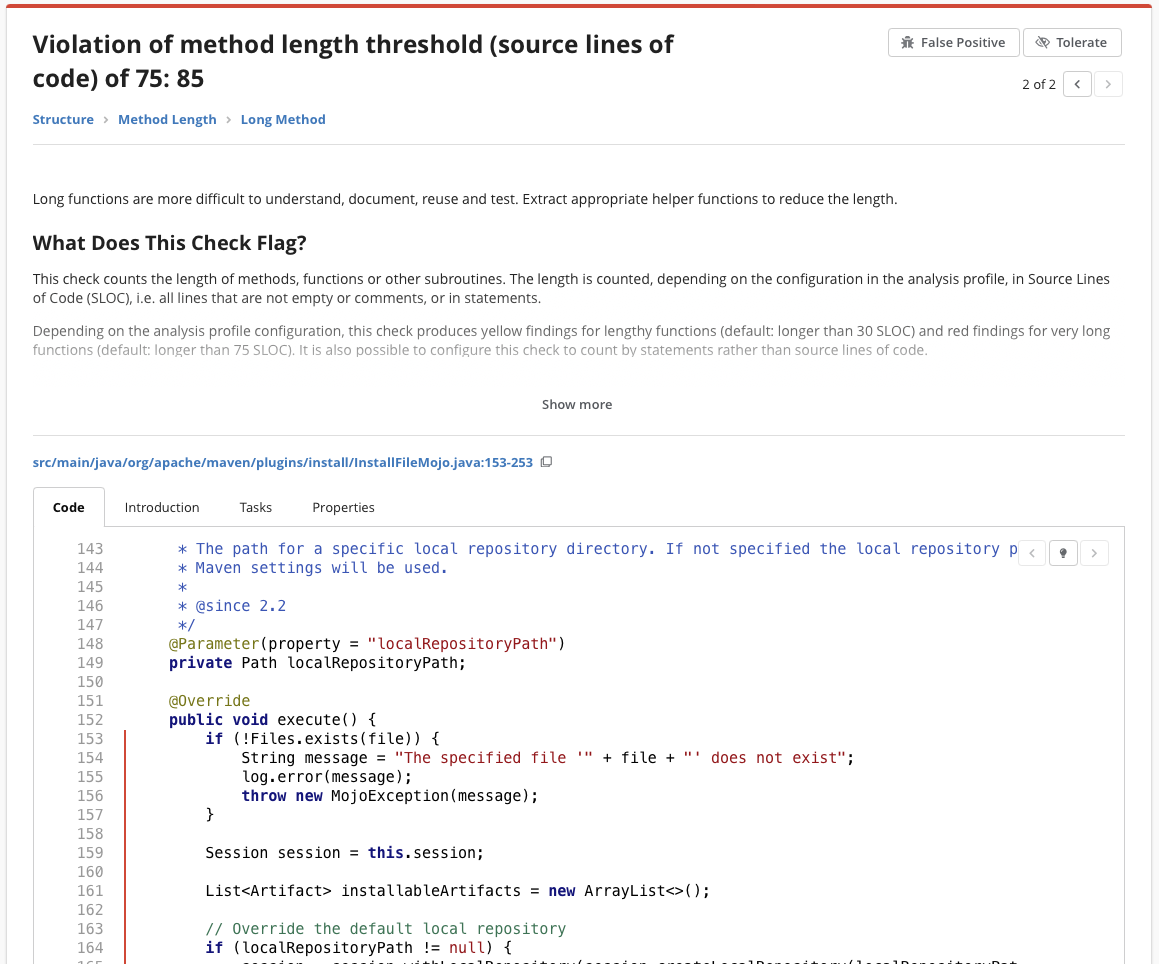
It shows you the finding message again as well as more detailed information about the impact of this type of finding on code quality.
You can use the buttons in the upper-right corner to mark the findings as tolerated or false-positive.
Using the tabs below the description, you can find out more about this finding:
Code (or Model for Simulink findings): Shows the code or model affected by the finding. You can also expand the code snippet so that the full file is visible.
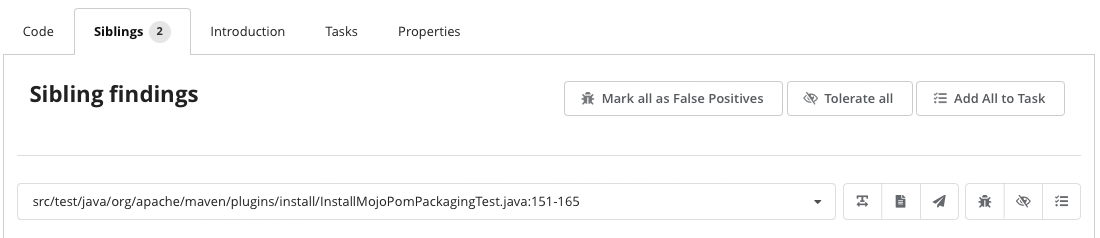
Siblings (visible if the finding has siblings): Shows the siblings of the current finding, e.g., all the instances of a clone finding.
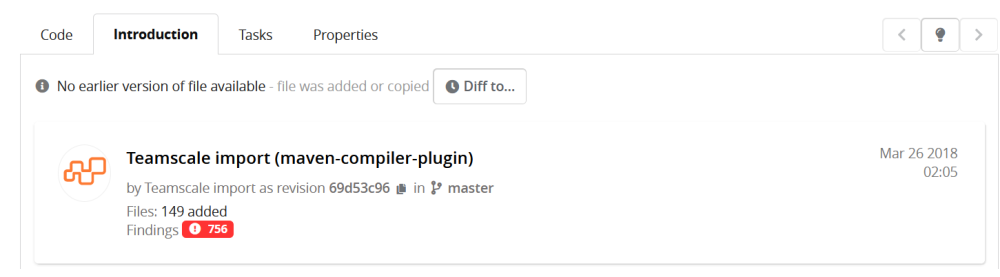
Introduction: Shows which commit introduced the finding. Here, the finding was already present in the first revision that Teamscale analyzed:
If the finding has been introduced at some point in the analyzed history, you can also check the introduction diff by clicking the
Introduction diffbutton (not in the screenshot).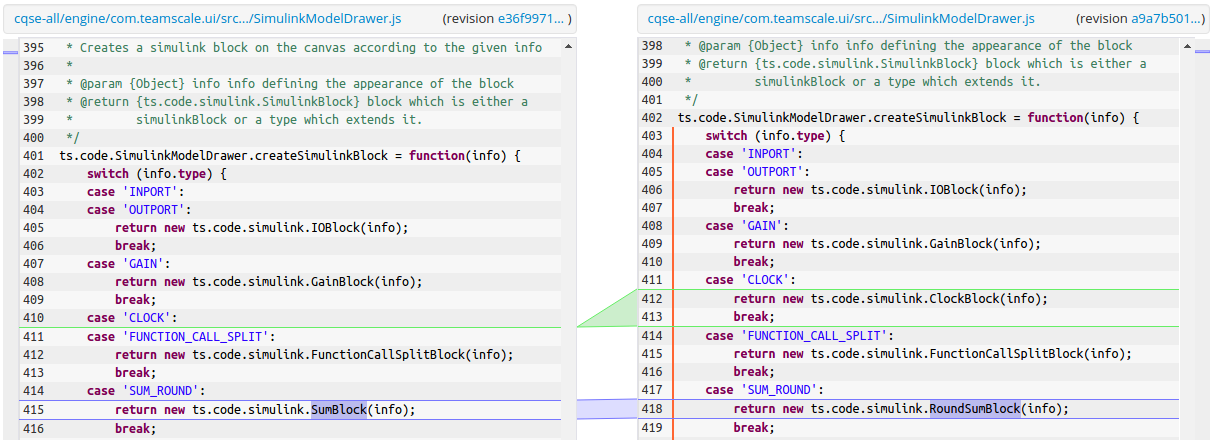
The lines that were added are shown in green. Blue denotes changes to existing lines and red indicates removed lines (not shown in the picture).
You can use the
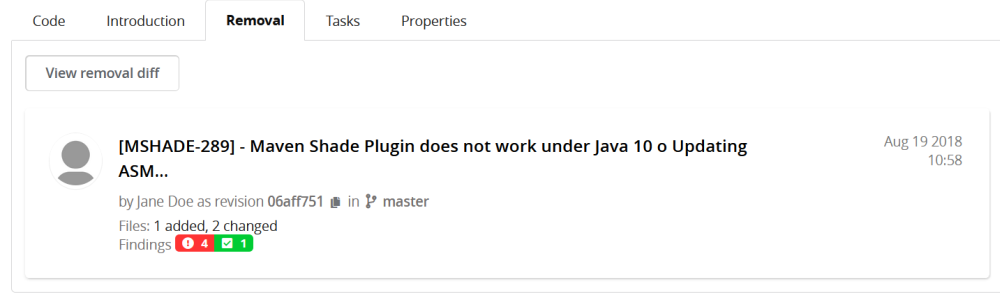
Diff to...to manually select an arbitrary repository state to compare against. This will show you the differences between the revision in which the finding was introduced and the revision you have just chosen.Removal (visible if the finding has been removed): Shows which commit removed the finding from the code base. Similar to the Introduction tab, you can also check the removal diff for the finding.
Tasks: Allows to attach the finding to a Teamscale task.
Properties: Shows additional properties of the finding, e.g. the finding's ID. The contents depend on the finding's type.
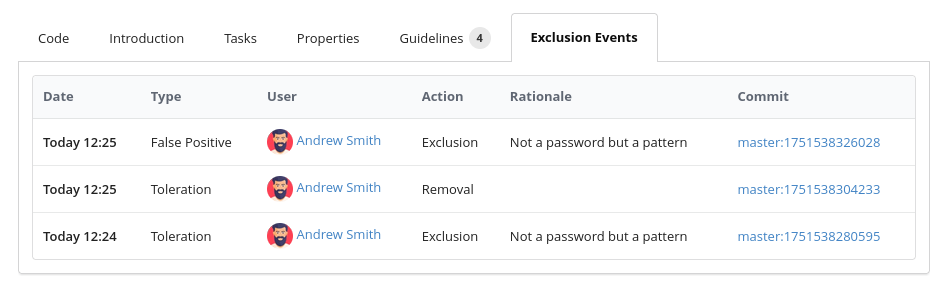
Exclusion Events: Shows past exclusion events of this finding on all branches, up to the current commit timestamp.
Refactoring Suggestions (Java & C#)
For long methods or files, Teamscale can also suggest how the code could be refactored. Simply click the that appears in the tab menu (see screenshot above).
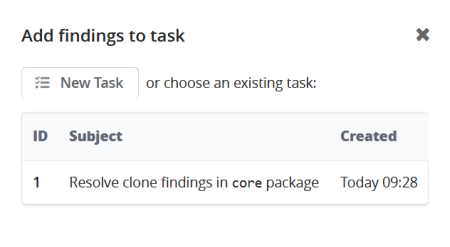
Action: Add Finding to Task
Tasks in Teamscale are a lightweight way to keep track of a finding (or a group of findings). The main advantage of tasks is that Teamscale will keep track of the findings you attached, which means they won't get lost as the code changes over time.
On the Findings Detail View, select the Tasks tab and then use the button Add to task to add a single finding to a task. You can also use the shortcut T for this. This will open the dialog below, in which you can either create a new task or add the findings to an existing task.
Marking findings as tolerated or false-positive
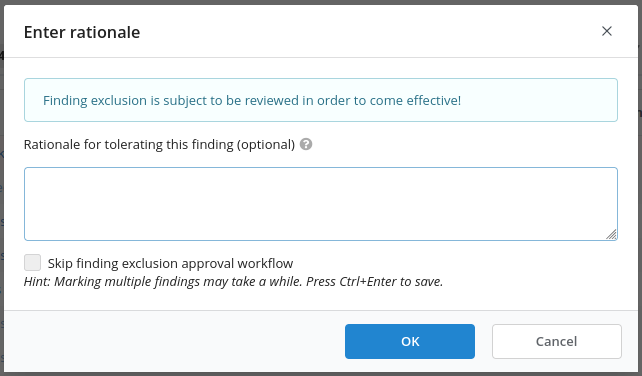
In Teamscale, you can manually exclude findings that you and your team aren't interested in. There are two types of finding exclusions:
- Tolerated findings are correct from an analysis point of view, but it has been decided that they should not be tackled (e.g., because their resolution requires unjustifiably high efforts).
- False positive findings are findings for which Teamscale's static code analysis wasn't accurate enough to correctly identify a finding. This can, for example, happen in a code region with complex dataflow.
Adding a clear rationale is crucial to provide transparency in the team about why a finding has been marked as tolerated or false positive. A good rationale can be short, but should clearly state the reasoning so that it can be reviewed if it still applies at a later point. For temporary tolerations, a clear deadline should be given. It can also be helpful to link a corresponding active task in an issue tracker to provide more context on the toleration.
Note that providing a rationale is optional by default, but can be enforced by activating the option "Disable empty rationale and force the user to insert at least some text" under Admin > Settings > Server Settings.
Excluded findings are visible for your entire team. Depending on the context, they will be marked with a corresponding icon in the finding tables (e.g. in the Delta perspective) or even be hidden completely (e.g. in finding badges).
When you merge a branch, Teamscale will transfer excluded findings from the source branch to the target branch, too.
Finding Exclusions after Teamscale Update
When you upgrade Teamscale and import a backup of your project, your excluded findings will be restored in the new Teamscale version.
False Positive Findings
We think that a low false-positive rate is crucial, so reach out to support@teamscale.com to let us know about any false-positives that you might encounter.
Action: Creating a Baseline
As described in General UI Features, Teamscale provides the concept of quality goals to manage potentially large amounts of findings. Quality goals preserving and improving involve defining a baseline - a point in time after which a finding is considered to be new.
To create or change baselines, navigate to Quality Goal Settings > Baselines in the left sidebar, which opens the Baselines view.
Exclusion Approval Workflow
To enhance accuracy and security in managing compliance for findings (or Software Composition violations), it may be desired to use a two-step process to mark findings. When this process is enabled, tolerations/false-positives are kept in a pending state until another user (e.g., QA-lead) approves or rejects these pending exclusions.
To enable the exclusion approval workflow for a project, do the following:
- Open the Project Configuration > Projects view
- Open the project options for the specific project
- Go to Finding Exclusion Workflow
Now you can see the following options:
| Option Name | Description |
|---|---|
| Enable workflow for red findings | Enables the exclusion approval workflow for red findings. |
| Enable workflow for yellow findings | Enables the exclusion approval workflow for yellow findings. |
| Enable workflow for violations for Software Composition Analysis | Enables the exclusion approval workflow for Software Composition violations (requires a Software Composition connector for the project) |
| Allow self-approval (or self-reject) of pending finding/violation exclusions | Whether it should be possible for someone with both the "Mark" and "Approve" permissions to approve their own pending exclusions. |
| Limit workflow to following quality indicators | Comma-separated list of finding quality indicators (e.g., "Structure" or "Security"). Only findings in these quality indicators will require the finding exclusion approval workflow. Defaults to all quality indicators if empty. |
If Enable workflow for red findings or Enable workflow for yellow findings is enabled, the approval workflow is generally considered enabled. This leads to the following changes:
Exclusion Behavior
For findings matched by the approval workflow settings (red/yellow, quality indicator) the following behavior changes:
Every finding exclusion (from the UI or IDE integrations) is automatically treated as pending.
A user can skip the approval workflow by checking the Skip finding exclusion approval workflow checkbox. This is only possible if the Allow self-approval of pending finding exclusions option is enabled, and the user has the necessary mark and approval permissions.
WARNING
In case you want to exclude multiple findings at once, where some findings require the approval workflow and others don't, one of the following can happen:
- If you have the possibility to self-approve pending exclusions, you can mark all findings at once. However, this will then skip the approval workflow.
- If you don't have the necessary permissions, or self-approval is disabled, you cannot mark these findings in a single operation. In this case, you have to mark the findings with and without approval workflow separately.
Findings List
The Findings Perspective will now contain tabs for pending tolerations and false positives: 
Findings Details
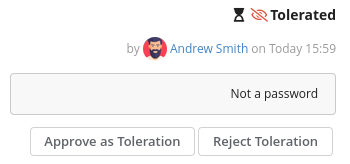
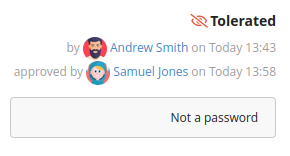
In case a finding is marked and the exclusion is still in the pending state, the following changes apply:
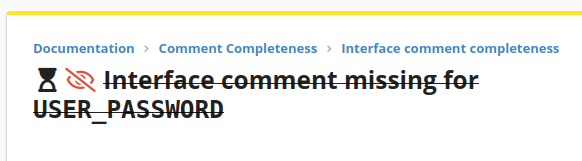
An hourglass icon indicates that the exclusion is still pending.
If the current user has the necessary permissions, they can withdraw the pending exclusion.
If the current user has the necessary permissions, they can approve or reject the pending exclusion.
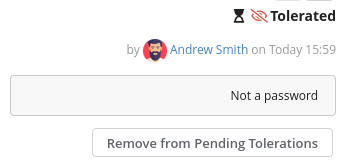
After the exclusion is approved, the details show the approving user and timestamp.
Delta Perspective
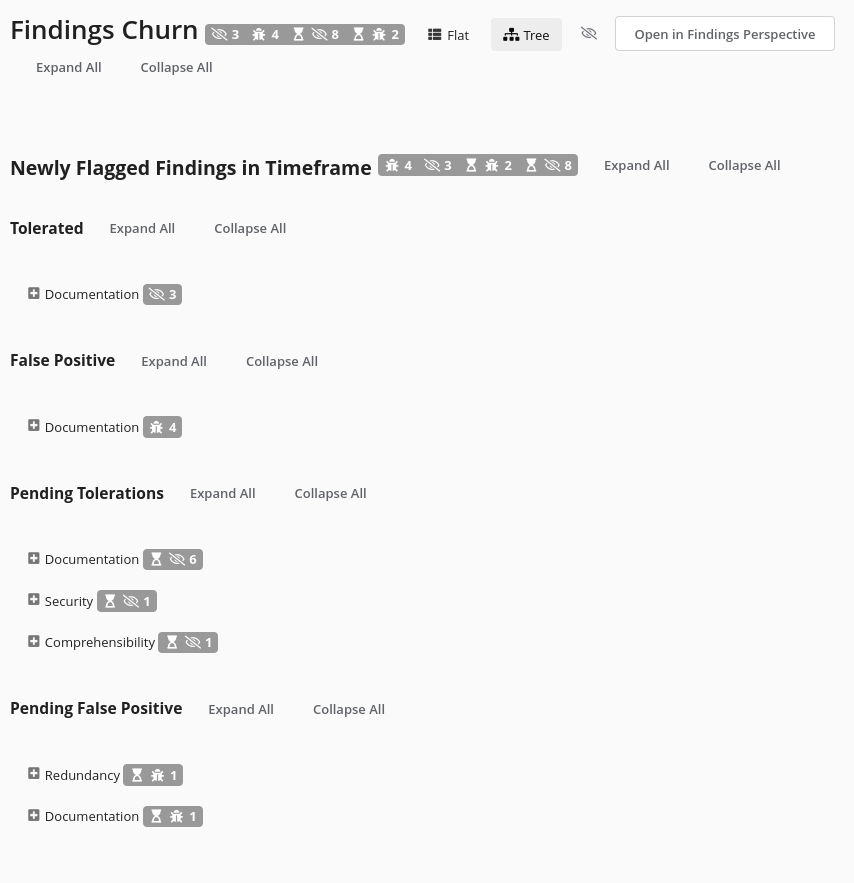
The Delta > Findings Churn view includes two new tabs/tree-branches for the pending exclusions, similar to the Findings List view: 
Things that don't change
INFO
Please note that apart from these mentioned changes, pending exclusions for findings are treated as "full" exclusions everywhere else (e.g., Metric Calculation, Merge Request Integration, etc.)
Approving Violations (Software Composition perspective)
When your Teamscale project has at least one Software Composition Analysis (SCA) tool connector, Teamscale will fetch Policy violations from the tool (e.g. JFrog Xray).
For ignoring violations in Teamscale, you can optionally enable the same approval workflow as for regular Teamscale findings (see above). When enabled, approvals (or rejections) will be required for every new Ignore Rule to come into effect.
You can see all Pending Ignored Violations in the Violations or the corresponding Build Details views.
To approve or reject a pending Ignore Rule, see the Ignore Rules view in the Software Composition perspective.