How to Import Users & Groups (LDAP, SAML, OpenID Connect, TFS)
Teamscale comes with a built-in user management system. In many scenarios, however, it makes more sense to connect to an existing user management system like LDAP instead.
Importing Users & Groups from LDAP Server
Teamscale provides LDAP integration to synchronize your LDAP users and groups with the teamscale server. Teamscale can import groups or individual users from a configured LDAP server.
To configure LDAP
- Go to the Admin perspective.
- Navigate to Settings > Authentication.
- Press Add under the LDAP Server section.
- Enter a name for the server.
The options are:
LDAP Server Options
| Option | Description |
|---|---|
| Hostname | The server’s hostname (URL). |
| Port | The server’s port. |
| SSL | Select this checkbox if the server is using SSL for connections. |
| Base DN for users | The DN under which the users are stored on the LDAP tree. For example: ou=users,dc=example,dc=com. |
| Base DN for groups | The DN under which the groups are stored on the LDAP tree. For example: ou=groups,dc=example,dc=com. |
| Group attribute | The attribute groups are saved with. For example: cn, if the group DN looks like: cn=GROUPNAME,ou=groups,dc=example,dc=com. |
| DN for the initial bind | Full DN of the user used for the connection. This user should have read access to all users and groups. For example: uid=readadmin,ou=users, dc=example,dc=com. |
| Password for initial bind | The password used by the bind user. |
| Login attribute | The attribute users are saved with. For example: uid, if the user DN looks like: uid=USERNAME,ou=users,dc=example,dc=com. |
| Group member attribute | The attribute under which each group stores its members. |
| First name attribute | The attribute used to store the first name of users. |
| Last name attribute | The attribute used to store the last name of users. |
| Email attribute | The attribute used to store the user’s email address. |
| Allow Login with LDAP | Select this checkbox if you want to use LDAP for login. |
Add the server by pressing the Add button.
You can now import entire groups of users using the Import button in Admin > Groups. If you wish to import single users, use the Import button in Admin > Users.
If you want to update users or groups, use the synchronize buttons found in both views. Synchronization of groups will also synchronize existing users and import recently added users of each group.
Automatic synchronization of users and groups can be enabled by entering a crontab expression via Admin > Settings > Authentication > Automatic server synchronization schedule, e.g., @midnight.
Typical Settings for Active Directory
When configuring an Active Directory server, typically, the following values can be used for the general settings:
| Option | Description |
|---|---|
| Group attribute | cn |
| Login attribute | sAMAccountName |
| Group member attribute | member (in some cases memberOf) |
| First name attribute | givenName |
| Last name attribute | sn |
| Email attribute |
Typical Settings for Open LDAP
The following table shows typical settings for configuring an Open LDAP server:
| Option | Description |
|---|---|
| Group attribute | cn |
| Login attribute | uid |
| Group member attribute | memberUid |
| First name attribute | givenName |
| Last name attribute | sn |
| Email attribute |
Recognition of LDAP user and group entities
Teamscale prevents you from importing unknown LDAP object entities as users or groups. It checks whether a found LDAP entity has a well-known user or group object class. Valid object classes for users are user, inetorgperson and valid classes for groups are group, groupOfNames and posixgroup. You can add additional object classes by passing a comma-separated list on the start of Teamscale using the -Dcom.teamscale.authenticate.ldap.user-object-classes="myusers,myotherusers" or -Dcom.teamscale.authenticate.ldap.group-object-classes="mygroups,myothergroups"JVM arguments.
Global LDAP Catalog
If users are stored in different domains and are thus not available from a single LDAP server, it is recommended to query the global catalog of one of the directory servers using port 3268 (or 3269 with SSL). The global catalog offers read-only access to most data of the whole domain tree and thus reduces the overhead to follow LDAP redirects to other servers. Not using the global catalog and following referrals will create a new connection for each LDAP request which may lead to refused connection errors.
Fallback LDAP Servers
If the LDAP server has fallback servers which are listed in the DNS record, it is recommended to configure the server host using the domain name instead of a single IP address. Teamscale will then use the fallback servers if the primary server is not available.
Using Azure DevOps Authorization (formerly: TFS Authorization Server)
Teamscale can import groups from teams or groups of an on-premise TFS or Azure DevOps server. This will only synchronize group membership information (authorization); actual authentication and user import has to be delegated to another provider, e.g., LDAP.
Before starting configuration, ensure you have added external accounts for your TFS/Azure DevOps server. This is usually the case if you already configured code analysis for a project on that server.
To configure Azure DevOps Authorization, go to the Admin perspective and open Authentication in the Settings page. Press Add under the TFS Authorization Server section and enter a name for the server.
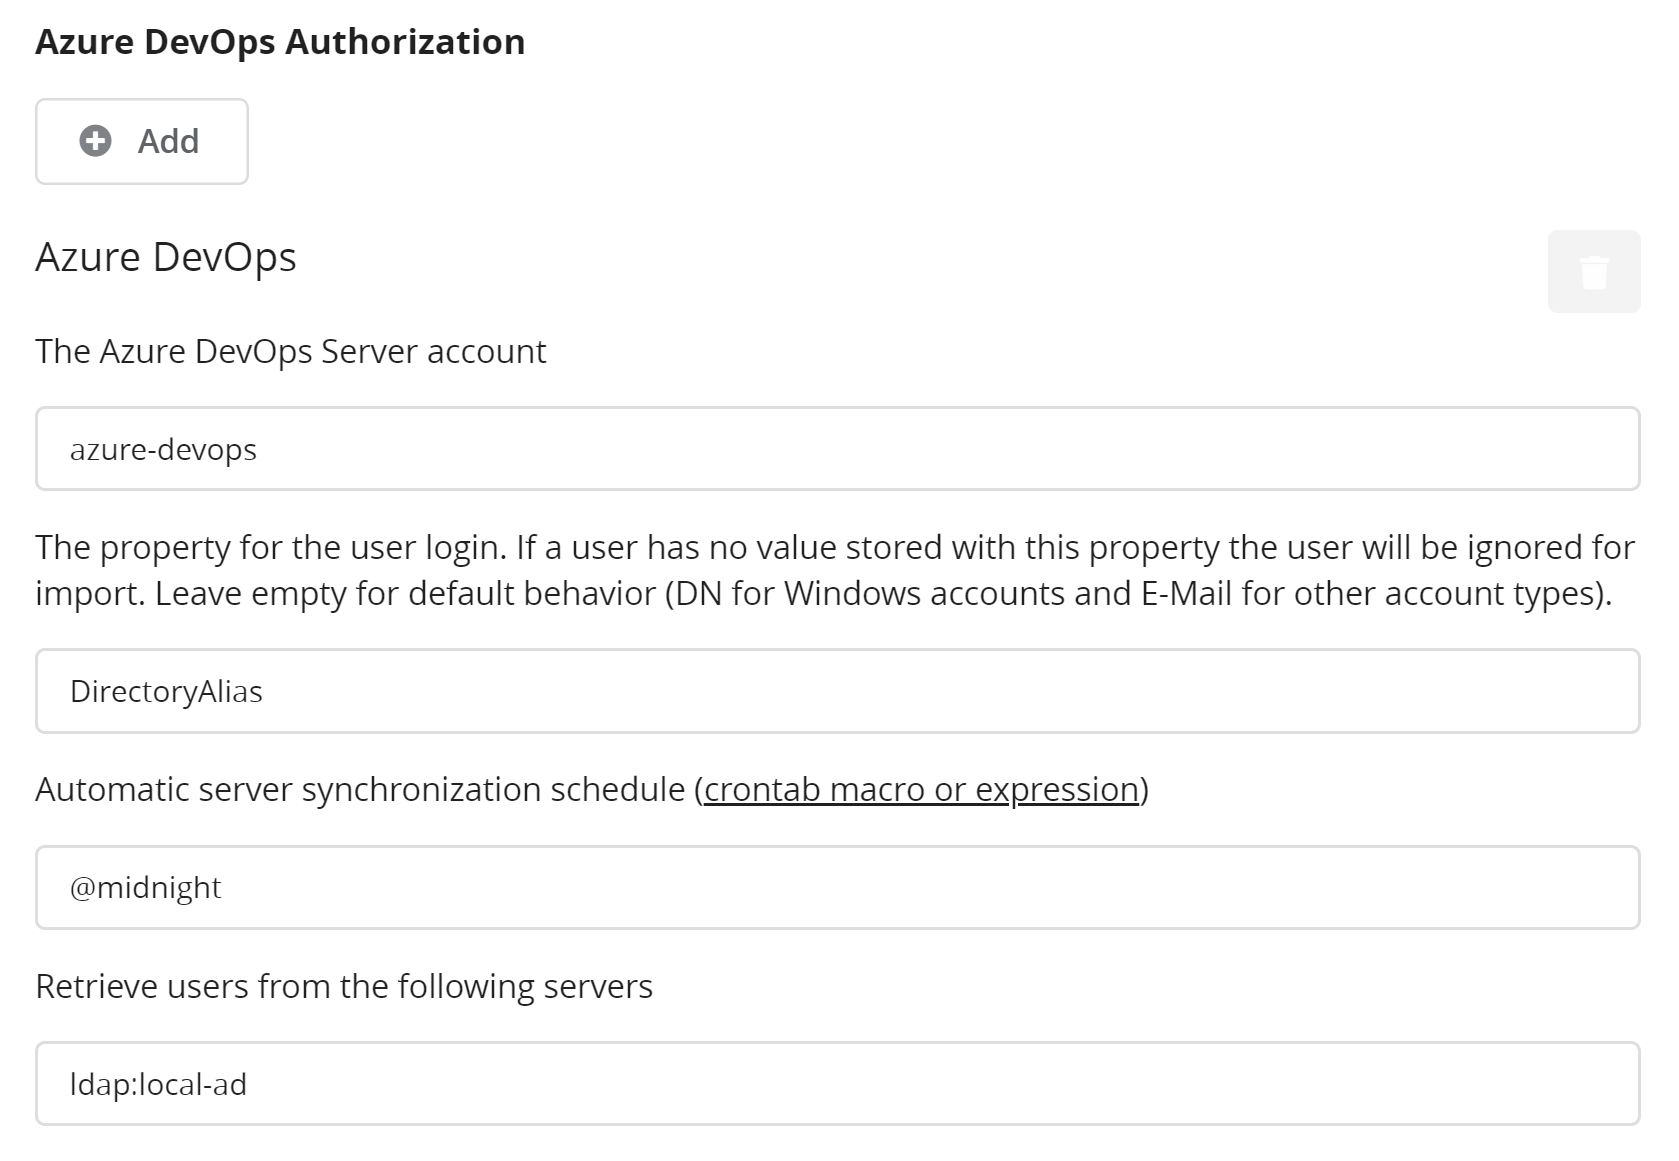
The image shows the configuration options for Azure DevOps Authorization. The different options are:
TFS Authorization Server Options
| Option | Description |
|---|---|
| The Azure Dev Ops Server account | The external account identifier of the Azure DevOps server. This must be configured first in External Accounts. |
| The property for the user login | The name of the user property that the delegated authenticator is queried for when importing users. This can be left empty in most cases. This means that for users in Azure DevOps Server who login with their Windows account, the DN (distinguished name) is used, and for all other users the E-Mail is used. If a value is specified, that specific property of the user in Azure DevOps Server will be extracted and used for further queries. Users that do not have that property specified or have an empty property will be ignored. |
| Retrieve users from the following servers | Mandatory for this connector. The identifier of the authentication provider that should be queried for users. Should be specified in the form of <type>:<name>, e.g., ldap:local-ad. |
Single sign-on using SAML 2.0 or OpenID Connect
This option can be used, if you already have a SAML 2.0 or OpenID Connect compatible Identity Provider. Note that OpenID Connect can only be used for authentication, which means that your groups and permissions still need to be managed in Teamscale or by connecting Teamscale to your LDAP server and importing corresponding users and groups. For SAML you can expose groups as a multi-valued SAML attribute, in which case Teamscale will synchronize the group information during user login.
First Step: Setup Identity Provider (outside Teamscale)
As a first step, you must configure your identity provider (e.g. Azure DevOps or Google Cloud) to allow requests from Teamscale.
For SAML, you need to configure at least the entity ID of the Teamscale service provider, which you can choose freely, and the assertion consumer. The latter is the Teamscale service called api/auth/saml/authenticate. So if your Teamscale server is configured to serve https://ts.example.com/, then the assertion consumer URL would be https://ts.example.com/api/auth/saml/authenticate.
The configuration details of your identity provider depend on the product used and are beyond the scope of this guide. After configuring your identity provider for SAML 2.0, you should obtain its entity ID and a metadata XML description of the identity provider in the form of a SAML 2.0 entity descriptor (an XML document that starts with a <md:EntityDescriptor> tag). This XML file must also contain the identity provider’s public key as an X.509 certificate.
Obtaining SAML Metadata XML from Teamscale.
You can also download a SAML metadata XML from Teamscale, which also contains a certificate that can be used for encrypted assertions. To obtain this, configure a SAML provider as outlined in the second step, but leave out the Metadata XML from the identity provider. Click on the button SAML Metadata at the top right of the configuration section to obtain the metadata itself or a URL that you can paste into your identity provider's configuration.
Note: The generated certificate is valid for 3 years. After this time, a new certificate has to be generated and Teamscale's Metadata XML in the identity provider updated. You can generate a new certificate using the "Regenerate Certificate" button. You can also let Teamscale automatically generate a new certificate before the current one expires, by enabling the "Automatically renew SP certificate" option. However, this is only recommended if the identity provider automatically updates the Metadata XML using the URL.
Second Step: Setup connection in Teamscale
- In Teamscale, in the Admin perspective navigate to Settings.
- Ensure that your
Teamscale instance base URLis set correctly. - Navigate to
Authentication. - Add a new connection with a meaningful name and fill the fields:
Add a new SAML 2.0 Identity Provider:
| Option | Description |
|---|---|
| Display name | An arbitrary string that is displayed on the button on the Teamscale login screen. Example: Corporate Login |
| Service Provider ID | ID of the service provider, i.e. the Teamscale instance. This must match what you configured in your identity provider for Teamscale. |
| Metadata XML | The entity descriptor metadata XML. This must also contain the identity provider’s public key as an X.509 certificate. Alternatively, you can provide a URL to download the metadata from and let Teamscale do the download. |
Most of the required information is parsed from the metadata you provide there.
- For testing, you should log out. On the login screen you should see a button that allows you to sign in using the configured identity provider.
Optional: Automatic user creation
You can configure the provider to automatically create new users after successful SAML or OpenID Connect authentication. For this, enable the option Automatically create authenticated users and fill out the additional fields, which describe the group to place these new users into and the SAML attributes containing aspects of the users (such as name and email address).
Optional: Group Synchronization
If your SAML Identity Provider supports to expose group membership as attribute, you can configure Teamscale to synchronize this group information. Note that you can not synchronize into existing groups. Instead, all groups from the SAML response will be automatically created. You can optionally filter the groups to be synchronized, if you want to focus on a subset.
Optional: Automatic redirection to the Single sign-on login page
You can configure to skip the built-in login page and automatically redirect to the login page of your GitHub, SAML or OpenID Connect authentication when opening Teamscale. For this, enable the option Single sign-on (SSO) login page redirection and ensure that you have exactly one SSO connection set, including the Authentication and GitHub Integration pages in the settings. If the option is enabled, you can still access the built-in login page, when you directly open it at <your-teamscale-url>/login.
Single sign-on using an Authentication Proxy and Bearer Token
This option can be used, if you already use an authentication proxy such as oauth2-proxy. The authentication proxy handles the authentication, creates a JWT token for successfully authenticated users and forwards them to Teamscale. In Teamscale you have to configure the public key to check the signature of the JWT token. The public key needs to be in the following JSON format:
{
  "kid":"Sb0vlqczKuAswnsIbWXf9fYCyHJ6VWOaHP4Zu2uHhz8",
  "kty":"RSA",
  "alg":"RS256",
  "use":"sig",
  "n":"hzhHooVkF7soIoYFFG5-pA_vCTB4YGOYWQo_aaFZ1dgmqKa5fsow8RmZhUL-bfp_W_0FgSJp5S6b4CdAW5s2566T48ZsqyoYAMnihyskuGyHUWmI8BJtmmYr8DZjZsTzk3jX3DKIC0OxtyMPnkf1lsBTWN-_R0VpgFAlPWgXTDiV4aO9L6fCCedyt4obzSwG-AMQL3t71sFErVvBJ_W1NmJtjV9CpdACtwF_rjjn_OkKDaXwiSfKm7NJKHE_56fHWWYihq15iJ7o58oVV_k073scJdK7-HRq5FwCgdxb-Hs9iUmhAujqAV_FMMq3ZCLTCgL8jBb45lgHfB66RBAQEQ",
  "e":"AQAB",
  "x5c":["MIICmTCCAYECBgGLj12/FTANBgkqhkiG9w0BAQsFADAQMQ4wDAYDVQQDDAVteWFwcDAeFw0yMzExMDIwOTI3NDdaFw0zMzExMDIwOTI5MjdaMBAxDjAMBgNVBAMMBW15YXBwMIIBIjANBgkqhkiG9w0BAQEFAAOCAQ8AMIIBCgKCAQEAhzhHooVkF7soIoYFFG5+pA/vCTB4YGOYWQo/aaFZ1dgmqKa5fsow8RmZhUL+bfp/W/0FgSJp5S6b4CdAW5s2566T48ZsqyoYAMnihyskuGyHUWmI8BJtmmYr8DZjZsTzk3jX3DKIC0OxtyMPnkf1lsBTWN+/R0VpgFAlPWgXTDiV4aO9L6fCCedyt4obzSwG+AMQL3t71sFErVvBJ/W1NmJtjV9CpdACtwF/rjjn/OkKDaXwiSfKm7NJKHE/56fHWWYihq15iJ7o58oVV/k073scJdK7+HRq5FwCgdxb+Hs9iUmhAujqAV/FMMq3ZCLTCgL8jBb45lgHfB66RBAQEQIDAQABMA0GCSqGSIb3DQEBCwUAA4IBAQA+Nj3BOQ5E5qVJC3NA6aH7VgM9u8XQmsKQsZKojFfNVVxJSeWR1hFjQ5dgl86YDng7VEMUqxeahyaK/43atOtFcUnjcZTLyNJHRThW9IGoyDAlHsLkIrdrEZuJ2XUVAcdMsKAeODq8GWTpL2c/xtaOrFMj7H6cI97rFJFfe4G9R/Z7XIiVzzx7XoHHi4NlJuNXaNHwvIgBSHqKF2nwynI3vFo705KQxqOgnZPmigp+/tK4Awqg27KaEKQhkl1zWOEvOFp0xYCrN0RKGe1k/93bL6HkHdTySnFXF4Li3muym7rJIj2XTo4/aA8t7ekZ0l8++oUMkcSPBPcFOOWcg8Wy"],
  "x5t":"YuQvOTSez5SwoDK4WJsKd-WN_5U",
  "x5t#S256":"IQSFkWXp0a5X4aFxKitYnGvE0h2AdLfJZRyDOQ8XxYs"
}
The field Claim for username can be used to configure which field of the token contains the username. Usually this is sub or username. The content of this field must match the username in Teamscale for successful authentication. If the Bearer token is not part of the authorization header but in a custom header field, you can list the used custom headers via Additional headers.
Note that authentication via Bearer Token can only be used for authentication, which means that your groups and permissions still need to be managed in Teamscale or by connecting Teamscale to your LDAP server and importing corresponding users and groups.