How to Connect Teamscale to Jira Server or Jira Cloud
Teamscale supports Jira Server as well as Jira Cloud. It integrates with Jira using Jira's built-in REST API.
Minimum Jira Version
Teamscale relies on Jira's REST API version 2, which is available with Jira Server 5.0 or later.
Teamscale will import issues and issue metadata from Jira to display its analysis results in the context of these issues.
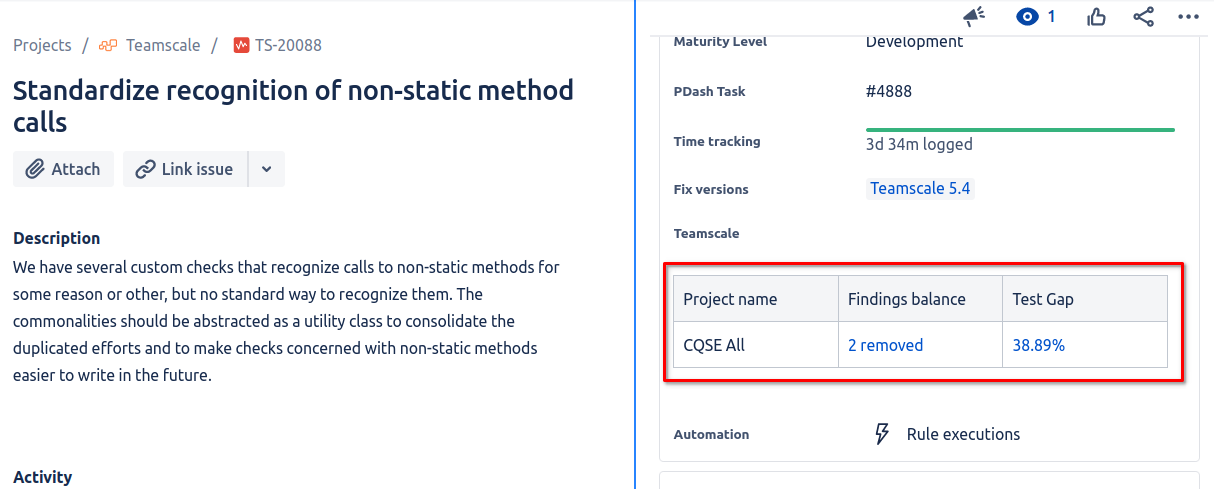
It can optionally also write its analysis results (findings, Test Gaps) into Jira. When a commit was analyzed and an associated Jira issue has been found in the commit message or branch name, Teamscale will write the findings and/or Test Gap data from Teamscale's issue details view into the Jira issue:
Create a Technical User for Teamscale in Jira
Teamscale is using the REST API to connect to Jira. Thus, you need to create a technical user in Jira that Teamscale can use to access the REST API.
The permissions of this user depend on whether you wish Teamscale to only read data from Jira or also to write analysis results to Jira. You must grant the following permissions to Teamscale's Jira user:
- Browse projects or Administer projects project permission for the relevant Jira project(s).
- Edit issues project permission for the relevant Jira project(s), if Teamscale should also write analysis results back into Jira issues.
Issue-level Security
If issue-level security is enabled in Jira, you must grant issue-level permission to view/edit the issues that should be analyzed.
Additional Permissions to Prevent Unwanted E-Mail Notifications from Jira
Teamscale will try to suppress e-mail notifications for the updates it makes in Jira. However, due to a Jira limitation, this will only work if the Teamscale Jira user is either Admin or Project Admin. See Atlassian Jira Issue JRASERVER-34423 for details.
We recommend you grant these permissions to prevent unnecessary e-mails to your Jira users.
Optional: Create a Custom Field for Teamscale in Jira
If you want Teamscale to write its analysis results into the Jira issues, we recommend you create a new custom field for this information. The custom field must be of type textarea.
Configure Teamscale to Connect to Jira
To enable Teamscale to update issues in Jira with Teamscale analysis results, you need to follow the steps:
Ensure that the public base URL is configured correctly in Teamscale. For this, open the settings page (Admin > Settings) and check the entry Teamscale instance base URL in tab Server Settings. This should point to the URL of the Teamscale server.
Select the Jira Issue Tracker connector during project creation.
Select or create an account for the Jira server. The account fields should be filled out as follows:
URI: Jira Server root URL (e.g.,
https://jira.example.com/)Username: The username of Teamscale's technical Jira user
Password: The password to use depends on your Jira edition
- Jira Cloud: The user's API token.
- Jira Server & Data Center: The user's password. You can also use a Personal Access Token. When using a PAT do not fill out the username field.
Non-ASCII characters in passwords
Jira Server and Data Center editions have a bug that prevents authentication via API if the password contains non-ASCII characters like German umlauts. If the password contains such characters, you must change it in order to connect to Jira via Teamscale.
This limitation does not apply to Jira Cloud.
Optional: Configure the Add to Jira issues Jira connector option. You can select which types of analysis results should be added to Jira issues. The results can be injected into the issue's description and/or into Jira custom fields (see above) that you specify in a comma-separated list. Details of Add to Jira issues connector option are available here. An example of a Jira issue field enhanced with Teamscale-generated data can be seen in the screenshot above.
Configure the Issue ID Pattern connector options.
Complete Jira connector configuration and save the Teamscale project.
When will Teamscale Write to Jira?
- If the specified Jira custom field is not present for a referenced Jira issue, nothing will be done (no error will occur).
- Jira issues will only be updated if Teamscale's analysis is in the "live analysis" state.
- If Shadow Mode is active, no information will be pushed to Jira.
Render Errors in Jira
If Teamscale's data don't render properly in Jira, please see this troubleshooting guide.
Importing Custom Fields from Jira
By default, Teamscale only imports a set of standard Jira fields. If you'd also like to import custom fields that you have configured in Jira, you'll have to open the Advanced settings of your Jira connector and edit the list of custom fields:

In the dialog that opens up, you can select all custom fields you wish to import:

Teamscale Dashboards as a Jira Gadget
To allow integration of Teamscale dashboards as Jira gadgets, follow those steps.
Ensure that the public base URL is configured correctly in Teamscale. For this, open the settings page (Admin / Settings) and check the entry Teamscale instance base URL in tab Server Settings. This should point to the URL of the Teamscale server.
In Jira go to a dashboard and click on Add gadget. In the next dialog select Manage gadgets. Note that this requires administrator access in Jira.
Enter the following URL in the input field and press Add gadget:
http://BASE-URL-OF-TEAMSCALE/api/gadgets/jira/dashboard.xml
The gadget should now be available and can be added to your Jira dashboard. After it has been added to a Jira dashboard, you need to specify the name of an existing Teamscale dashboard that should be shown.
Format of Dashboard Name
The dashboard name is the UUID you can see in the URL when the dashboard is opened in Teamscale. You can copy it by clicking on the Edit icon and selecting "Copy name to clipboard".
Prior to Teamscale version 8.7, you need to prefix the entered dashboard name with the username of the owner of the dashboard, e.g. admin/my-dashboard. In this case, you can see both the username and the dashboard name in the URL when the dashboard is opened in Teamscale.
Accessing Teamscale behind a Reverse Proxy
In case Teamscale is running behind a reverse proxy, additional steps are needed to access content from Teamscale in other Websites and Web apps such as Jira. Please see the corresponding entry in the documentation.